AshubaSHOP IMS — User Guide
Everything you need to run your business with the AshubaSHOP Inventory Management System — whether you sell products, manage stock, or track services. Use the sidebar to jump to any topic, or scroll from top to bottom.
🚀 Getting Started
Sign Up & OTP Verification
Creating your free 30-day trial account takes about two minutes. No credit card is required. Visit ashubashop.com/trial/ and follow the steps below.

- Open ashubashop.com/trial/ in your web browser.
-
Fill in the four required fields on the registration form:
- Business Name
- The official trading name of your business (e.g., Amani Electronics, Zawadi Boutique, Juma Pharmacy). This name prints on all your receipts and reports.
- Full Name
- Your personal full name as the account owner or manager.
- Email Address
- A valid email you can access. Used for account recovery and system notifications.
- Phone Number
- Your active mobile number including country code (e.g.,
+255712345678). A one-time PIN will be sent here by SMS.
- Click Send OTP. You will receive a 6-digit PIN via SMS within a few seconds.
- Enter the OTP code in the verification field. The code is valid for 10 minutes. If it expires, click Resend OTP to get a new one.
-
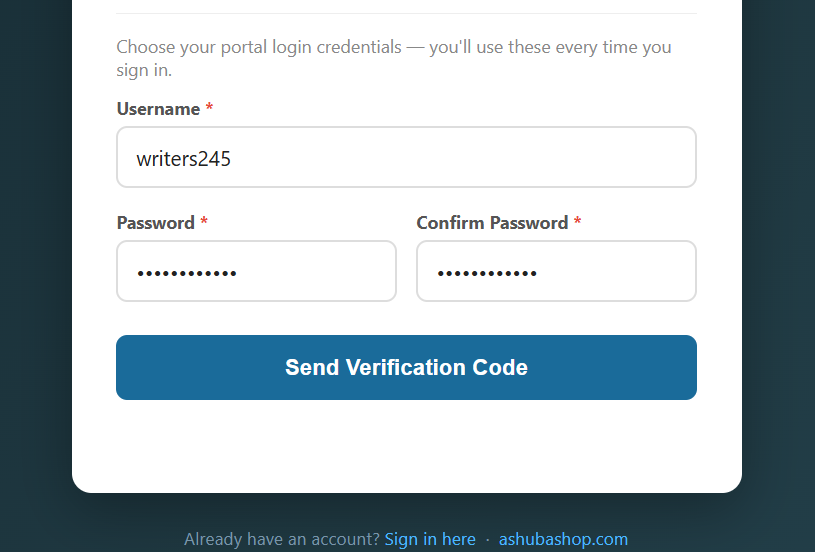
Once verified, create your login credentials:
— Username: letters, numbers, and underscores only; no spaces (e.g.,
mwangi_hw).— Password: minimum 6 characters. A mix of letters and numbers is recommended.
- Click Create Account. You are redirected to the login page and your trial is now active.
amani_biz or zawadi_shop). It is easier to remember and faster to type at the start of each day.
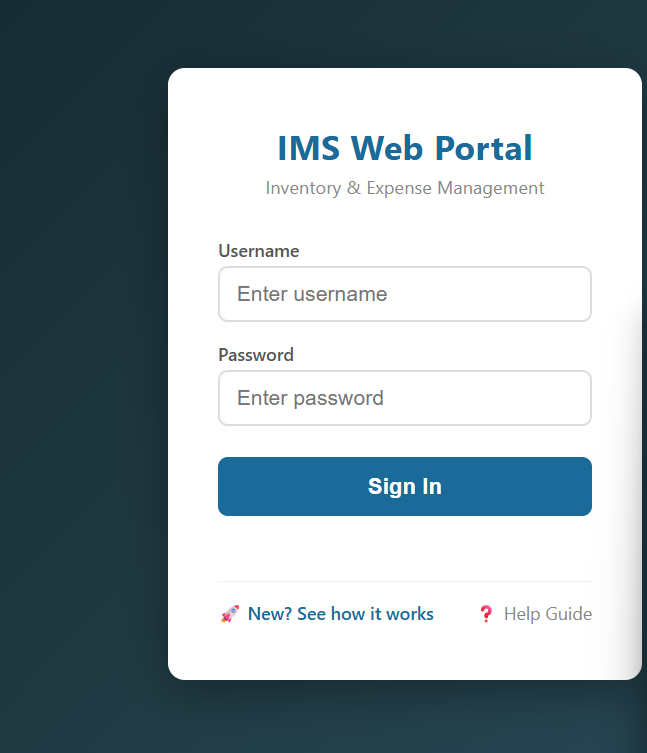
First Login
After registration, log in through the app portal. Bookmark the page so you can return to it quickly every day.
- Open
web_portal.htmlin your browser (or navigate to your deployed app URL). - Type your Username and Password in the login form.
- Click Login. You are taken directly to the Dashboard.
Your free trial runs for 30 days from registration date. The trial has two distinct phases:
| Trial Phase | Days | Access Level |
|---|---|---|
| Full Admin Access | Days 1 – 7 | Complete access — create and edit orders, manage inventory, run reports, and change all settings. |
| Read-Only View | Days 8 – 30 | Free plan access — continue creating orders, adding products, and viewing reports with modest monthly usage limits. Advanced editing and deletes are restricted until you upgrade. |
Setting Up Your Inventory
Before creating orders or recording sales, add your products or services to the system. The inventory catalogue is the foundation that all orders, sales, and purchase orders are built on — whether you stock physical goods or sellable service packages. Setting it up first ensures the entire app works correctly from day one.
- Log in and click the Inventory tab in the main navigation.
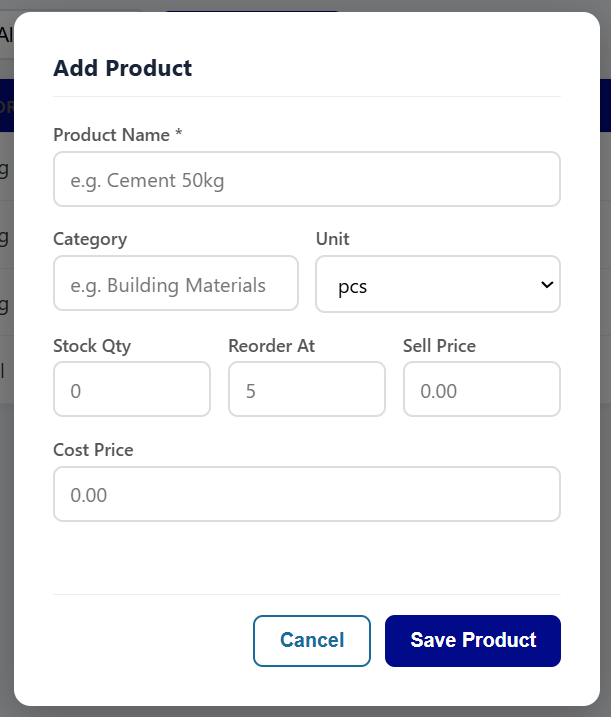
- Click the + Add Product button at the top-right of the inventory table.
- Fill in all the product fields (see descriptions below).
- Click Save Product. The product appears immediately in your inventory list.
- Repeat this for every product your shop stocks.
- Product Name
- The display name of the item — be specific to avoid confusion (e.g., Panadol 500mg Strip rather than just Panadol, or White Cotton Shirt XL rather than Shirt).
- Category
- Select the most fitting category from the 14 available (full list in the Inventory section).
- Unit
- The unit of measure for this product, e.g., Bag, Piece, Metre, Litre, Box, Roll.
- Stock Quantity
- Your current on-hand quantity at the time of entry. The system tracks this automatically going forward.
- Cost Price
- What you paid per unit to your supplier. Used to calculate gross profit in reports.
- Selling Price
- The price you charge customers per unit. This is shown in order forms and printed on receipts.
- Reorder Level
- The minimum quantity below which the system flags the item as low stock. Set this to the quantity you are not comfortable going below.
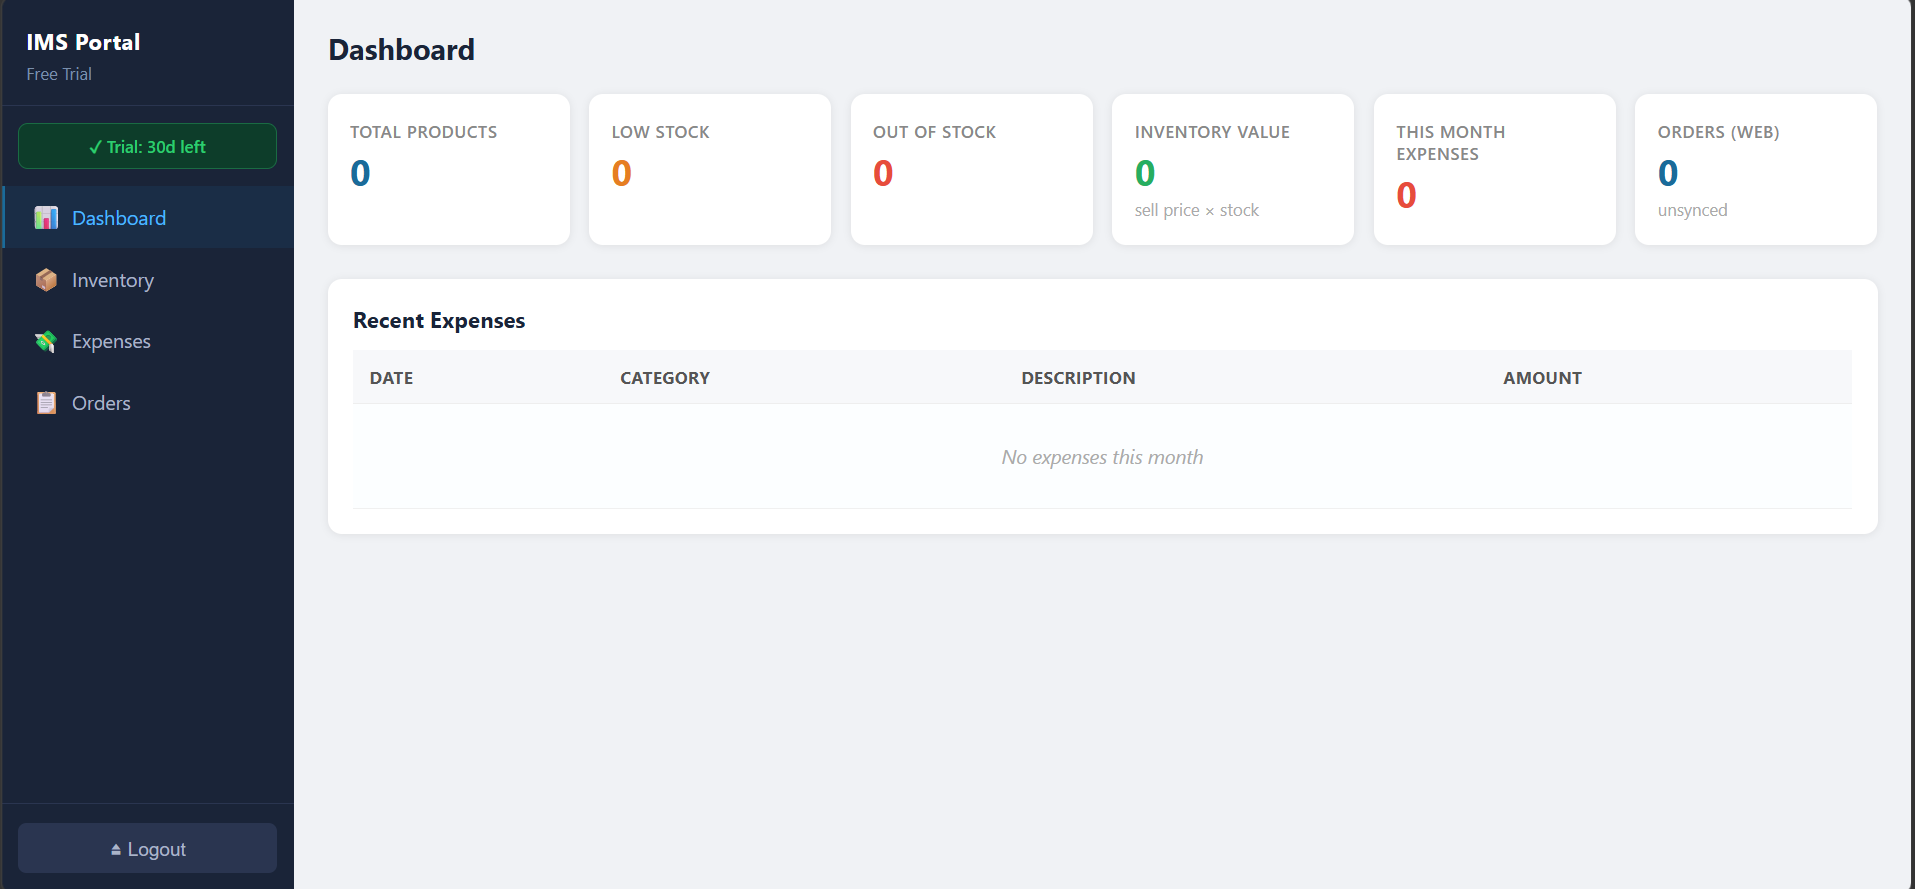
📊 Dashboard
The Dashboard is the first screen you see after login. It gives any business owner or manager an instant snapshot of performance — summarising revenue, stock health, outstanding balances, and key trends in real time as transactions are recorded throughout the day.
Overview Cards
Nine stat cards are displayed across the top of the Dashboard, giving you an instant snapshot of today's activity and month-to-date performance:
| # | Card | What It Shows |
|---|---|---|
| 1 | Today's Revenue | Total confirmed sales value for the current calendar day. |
| 2 | Today's Orders | Number of orders confirmed as sold today. |
| 3 | Month Revenue | Cumulative revenue from all confirmed sales in the current calendar month. |
| 4 | Gross Profit (Month) | Month-to-date revenue minus cost of goods sold (COGS). Operating expenses are not included here. |
| 5 | Total Products | Number of distinct products currently in your inventory catalogue. |
| 6 | Low Stock Items | Count of products at or below their reorder level. Clicking this card filters inventory to show only these items. |
| 7 | Out of Stock | Products with zero units on hand. These cannot be added to new orders. |
| 8 | Outstanding Credit | Total amount owed to your business across all unsettled credit sales. |
| 9 | Pending POs | Number of Purchase Orders sent to suppliers that have not yet been fully received. |
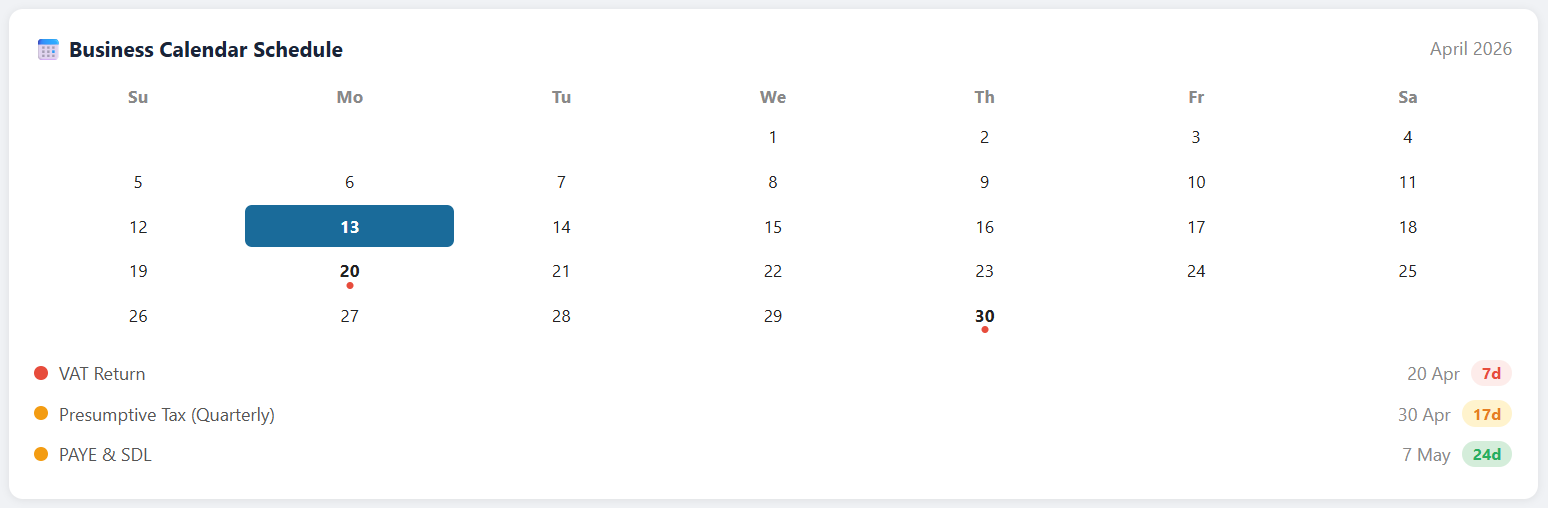
Business Calendar
The Business Calendar widget shows a monthly view of upcoming important dates. It combines two types of entries:
- TRA Deadlines
- Automatically included filing and payment dates from the Tanzania Revenue Authority — monthly VAT submissions, quarterly presumptive tax periods, and annual return dates. These are pre-loaded and cannot be edited.
- Custom Reminders
- Events you add yourself — supplier payment due dates, stock-taking days, salary dates, bank loan repayments, or any other business event. Click + Add Event on the calendar widget to create one. You can set a title, date, and optional note.
Events are colour-coded: TRA deadlines appear in amber/orange; your custom events appear in the brand blue. Clicking any date that has events shows a small popover with full event details.
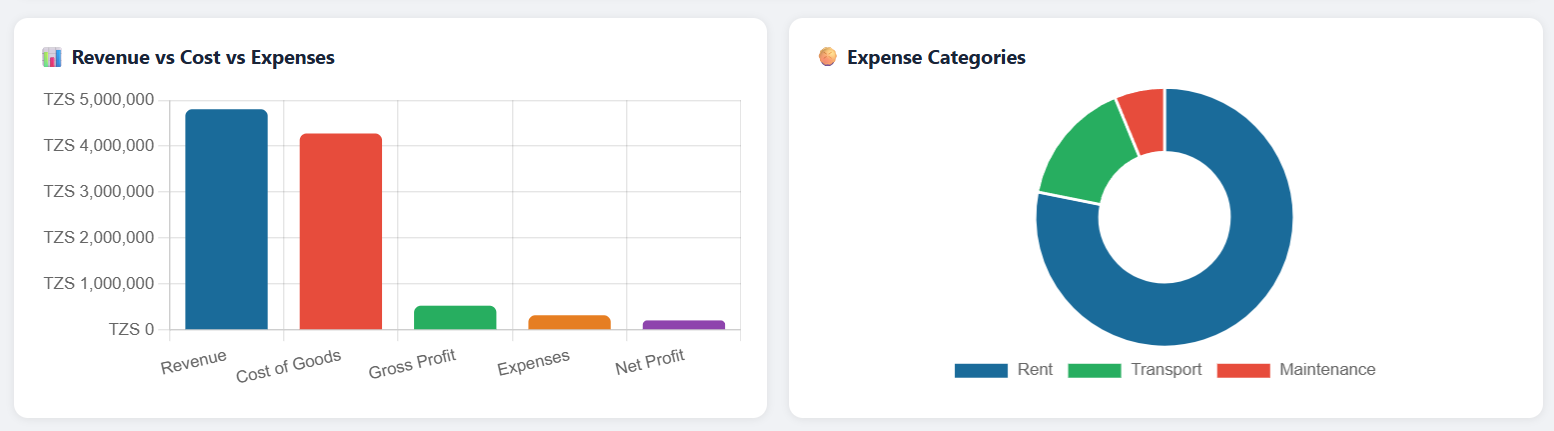
Charts & Insights
Below the stat cards and calendar, two charts help you understand performance trends:
- Revenue vs Expenses — 6-Month Bar Chart
- Displays your confirmed sales revenue alongside recorded purchase costs for each of the last 6 calendar months. Hover any bar to see exact figures. A consistently growing revenue bar relative to expenses indicates improving profitability.
- Payment Method Breakdown — Pie/Donut Chart
- Shows what percentage of your sales this month were paid by Cash, Mobile Money, Bank Transfer, or Credit. Useful for understanding customer payment preferences and planning cash-flow accordingly.
The Insights panel below the charts analyses your data and generates short, plain-language action suggestions — for example: "3 products are out of stock but had sales in the last 30 days — consider restocking." or "Credit sales represent 40% of total revenue this month, increasing cash-flow risk." Insights refresh automatically each time the Dashboard is opened.
📦 Inventory
The Inventory tab is the master catalogue of every product or service item your business offers. Orders, sales, and purchase orders all reference items from this catalogue.
Adding & Editing Products
New products are added via the + Add Product button (full steps in Getting Started). From the inventory table you can also edit or delete existing products:
- Click the ✏ Edit icon on a product row to open the edit form. Change any field and click Update Product to save.
- Click the 🗑 Delete icon to remove a product. A confirmation dialog will appear. Products referenced by existing unarchived orders cannot be deleted — archive or finalise those orders first.
Available Product Categories (select the best fit for your business type):
General Merchandise Electronics & Accessories Clothing & Apparel Food & Beverages Health & Pharmacy Building & Construction Tools & Hardware Furniture & Interiors Stationery & Office Agricultural Supplies Beauty & Personal Care Auto Parts & Garage Services & Labour Other
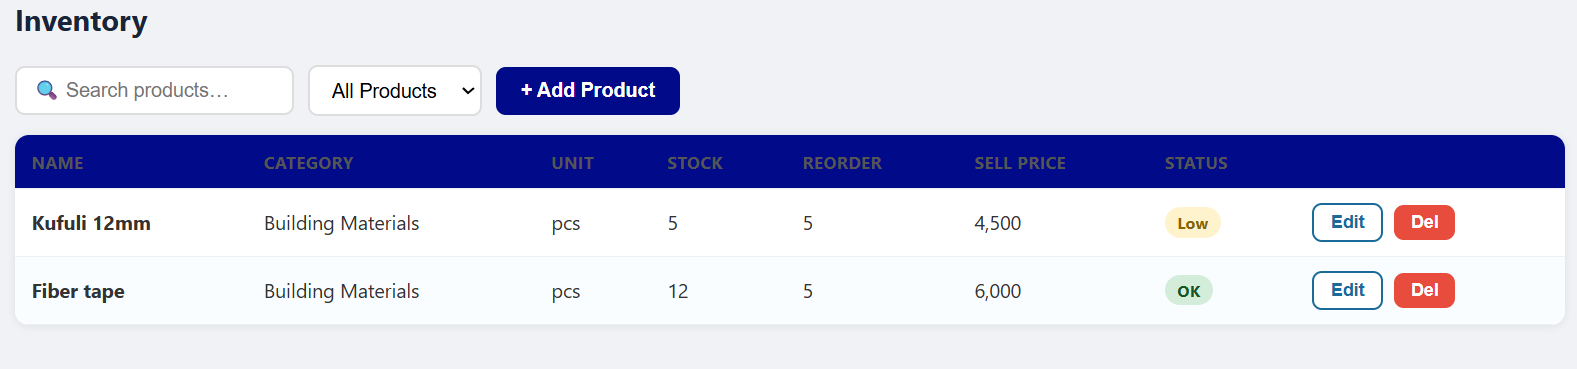
Stock Level Badges
Each product row in the inventory table displays a coloured badge showing its stock status at a glance:
| Badge | Condition | Meaning & Action |
|---|---|---|
| ● OK | Stock > Reorder Level | Sufficient stock on hand. No immediate action needed. |
| ● Low | 0 < Stock ≤ Reorder Level | Running low. Consider raising a Purchase Order with your supplier soon to avoid running out. |
| ● Out | Stock = 0 | Completely out of stock. This product cannot be added to new orders. Restock immediately via a Purchase Order. |
Click any column header to sort the inventory table by that column. Clicking Stock Status groups all low-stock and out-of-stock items together at the top for quick review.
📋 Orders
An Order records what a customer wants to buy or has requested. Submitting an order alone does not reduce inventory stock or book revenue — those happen when you confirm the sale after payment. This two-step process lets you prepare orders in advance, quote customers, and give them time to decide.
Creating an Order
- Go to the Orders tab and click + New Order.
- Enter the Customer Name. For walk-in customers with no account, a generic name like "Walk-in" or "Counter Sale" works fine.
- Optionally enter the customer's Phone Number. This is stored with the order and printed on the receipt for reference.
-
Add products to the order:
— Click + Add Item.
— Select a product from the dropdown. The list shows product names and current selling prices from your inventory.
— Enter the Quantity. The line total (price × quantity) calculates automatically.
— Repeat to add as many items as needed.
- Review the order summary at the bottom — it shows each line total and the overall grand total.
- Click Submit Order. The order is saved with status Pending and appears in the Orders list, ready to be confirmed when the customer pays.

Draft Orders
If you start building an order but need to step away before it is complete — for example, while waiting for the customer to confirm quantities — use Save as Draft instead of Submit. Draft orders are saved with status Draft and do not appear in revenue figures or affect stock.
To resume a draft, open the Orders tab, locate the draft in the list (drafts are shown at the top), and click ✏ Continue. Make your changes, then either submit or discard the draft.
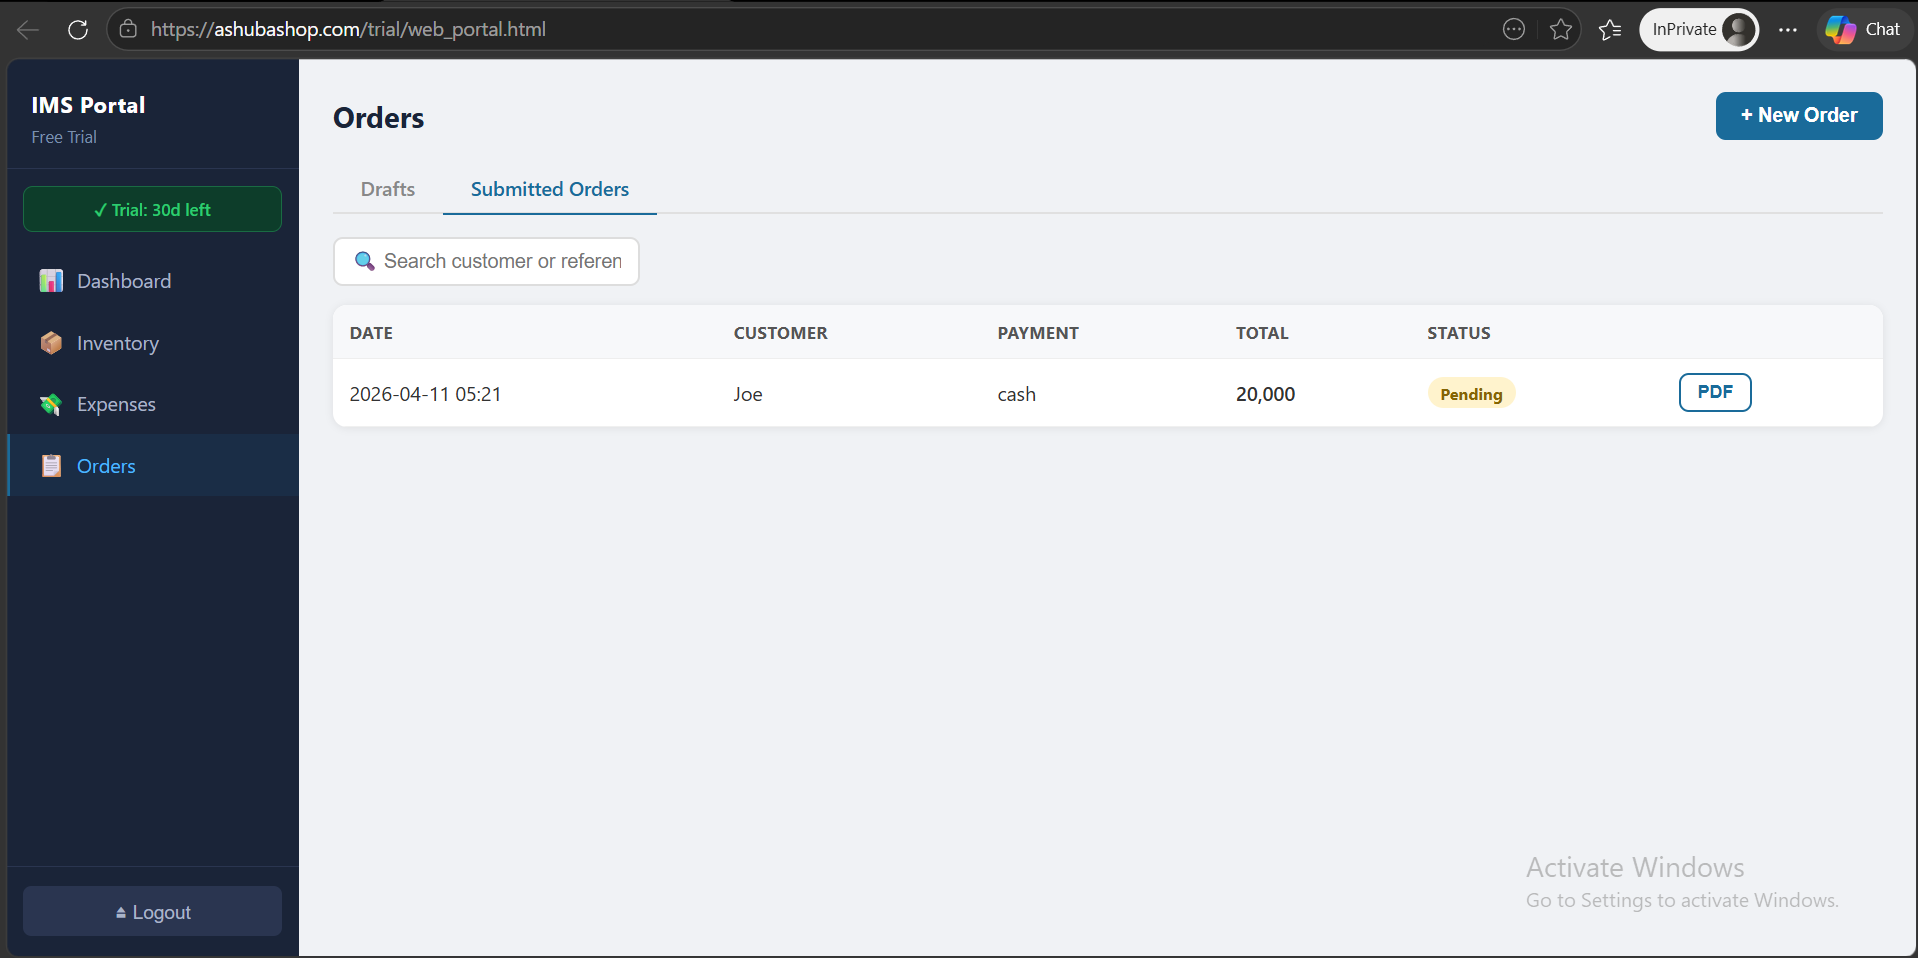
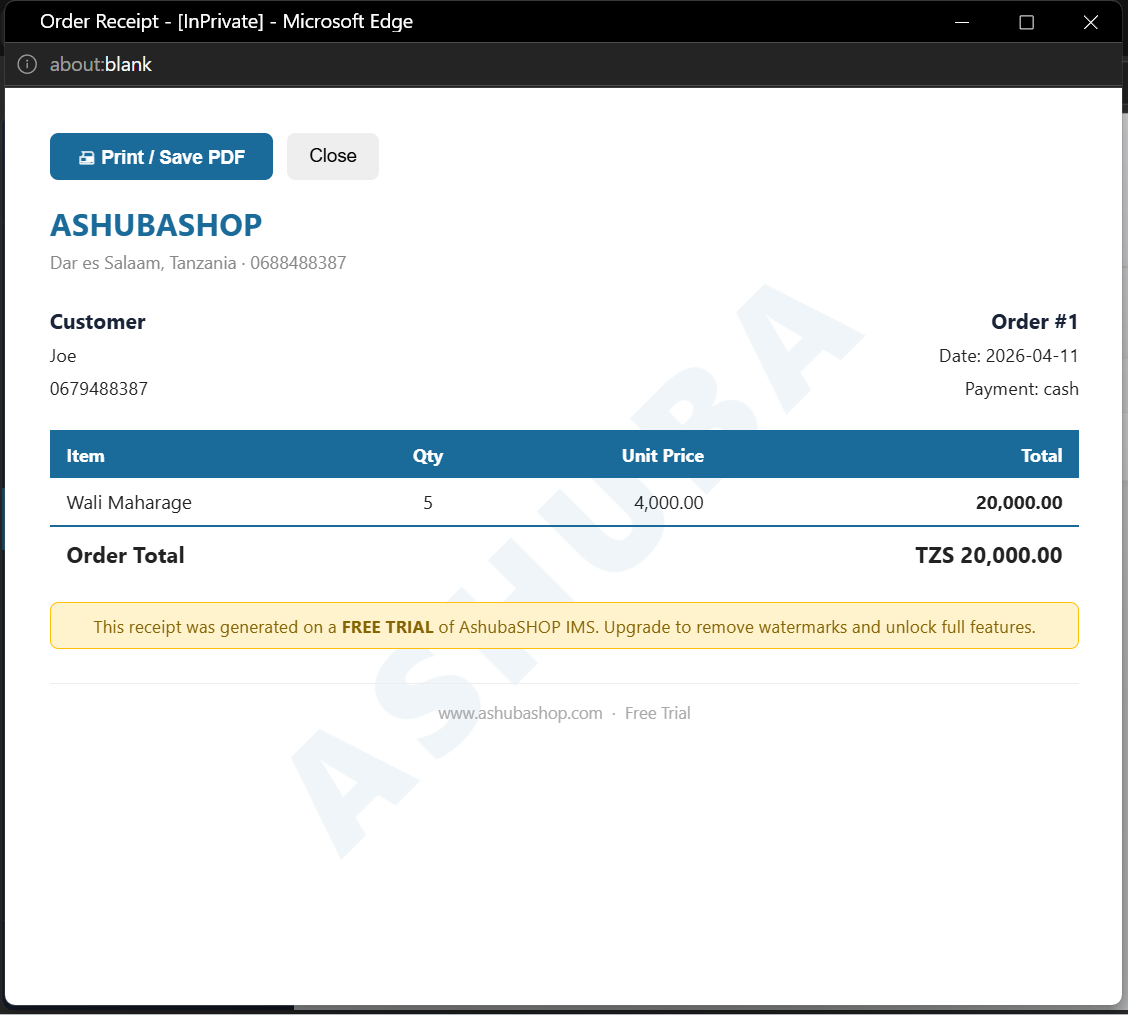
Printing PDF Receipts
Any confirmed (sold) order can be printed as a branded receipt. The receipt includes your company name, address, phone, logo (if uploaded in Settings), the order date and reference number, customer name, an itemised list with quantities and unit prices, and the grand total.
- In the Orders list, click the row for the order you want to print.
- In the order detail panel, click 🖨 Print Receipt.
- A formatted, print-ready PDF preview opens in a new browser tab.
- Use your browser's print dialog (Ctrl+P / Cmd+P) to send it to a printer or save as a PDF file.
💰 Sales
A Sale is the confirmed transaction when a customer actually pays. Confirming a sale is what reduces inventory stock and records revenue in your reports and dashboard.
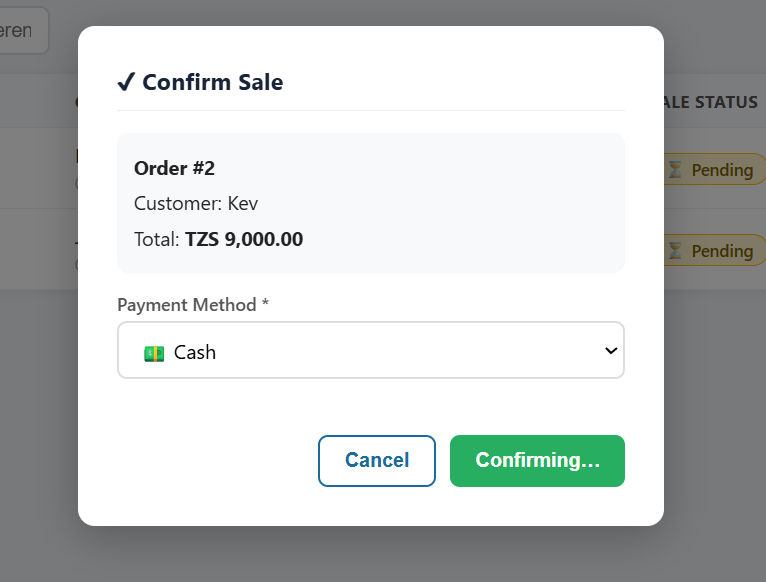
Confirming a Sale
- Open the Orders tab and find the order the customer is paying for.
- Click the ✔ Confirm Sale button on that order row.
- The Confirm Sale dialog opens. Select the Payment Method used by the customer (see options below).
- Enter the Amount Received. For full payment, this equals the order total. For partial or credit payment, enter the upfront amount paid now.
- Click Confirm. The system:
— Records the sale and logs it to your revenue reports.
— Reduces inventory stock for every item in the order.
— Updates the order status to Sold.
— If credit balance remains, adds it to the Outstanding Credit tracker.
Payment Methods
| Method | Description |
|---|---|
| Cash | Customer pays the full amount in physical cash. Sale is fully settled immediately. |
| Mobile Money | Payment via M-Pesa, Tigo Pesa, Airtel Money, or similar. You may enter a transaction reference number for your records. |
| Bank Transfer | Direct bank transfer or cheque payment. Enter a reference or cheque number for reconciliation. |
| Credit | Customer receives goods now and pays later. Goods leave your stock but cash is outstanding. See Credit Sales below. |
Credit Sales
A credit sale allows a trusted customer to take goods before paying. Stock is reduced immediately on confirmation, but the payment is recorded as outstanding.
- In the Confirm Sale dialog, choose Credit as the payment method.
- Enter the Advance Paid amount — the amount the customer is paying today upfront (enter
0if nothing is paid now). - Click Confirm. The outstanding balance (order total minus any advance) is recorded against this customer.
All outstanding credit sales appear in the Outstanding Credit dashboard card and in the Sales tab under "Credit Sales". To record a later payment, open the sale and click Record Payment. Enter the amount received. When the full balance is cleared, the sale is automatically marked Fully Paid.
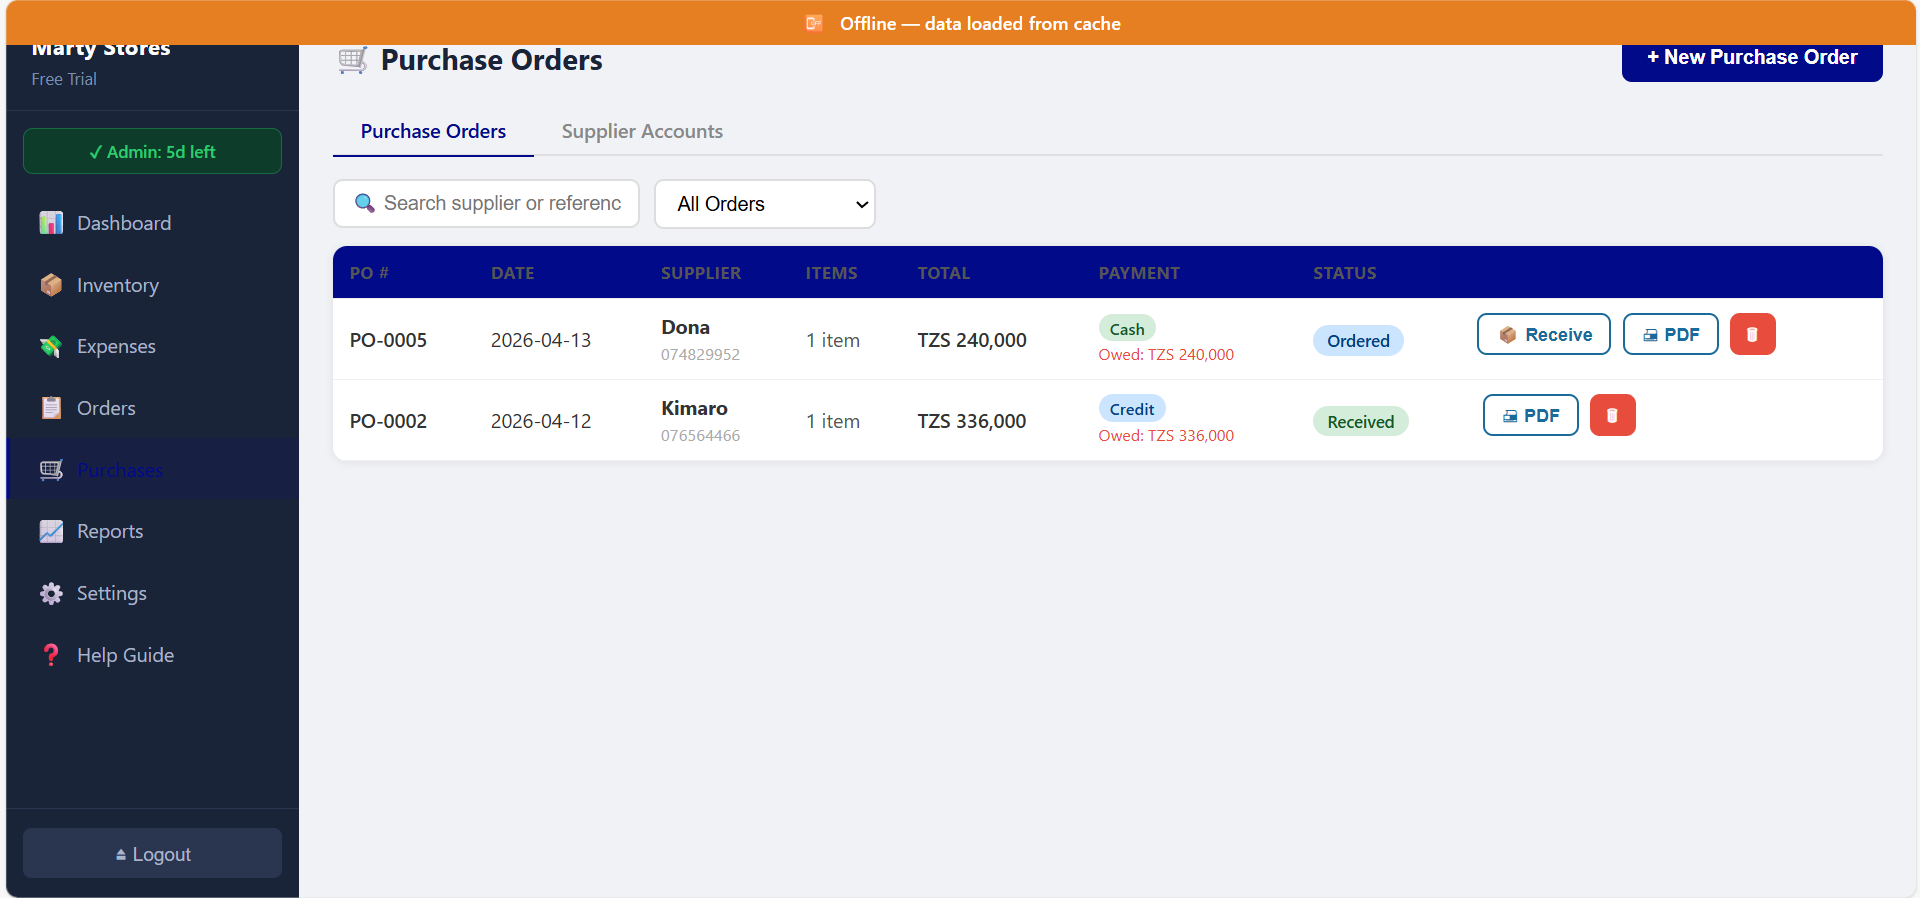
🛒 Purchase Orders
Purchase Orders (POs) let you formally record goods you order from suppliers, track what has arrived, and update your inventory when goods are received. The full process is a structured 3-step wizard that ensures accuracy at every stage.
Creating a Purchase Order
- Go to the Purchase Orders tab and click + New PO.
-
Enter the supplier details:
- Supplier Name
- The company or individual you are ordering from.
- Supplier Phone
- Contact number for this supplier (optional but recommended for quick follow-up).
- Expected Delivery Date
- The date you expect the goods to arrive at your premises. Shown in the Business Calendar as a reminder.
- Click + Add Item for each product you are ordering. Select the product from your inventory list, enter the quantity you are ordering, and confirm the unit cost price.
- Review the PO total and click Submit PO. The PO is saved with status Pending and is now visible in the Pending POs dashboard card.

Receiving Goods — 3-Step Process
When goods arrive from your supplier, open the relevant PO in the Purchase Orders tab and click Receive Goods to start the wizard.
Step 1 — Goods Arrival
For each item listed on the PO, select its arrival status from the dropdown:
| Status | When to Use |
|---|---|
| Fully Received | All ordered units arrived and are in good, sellable condition. |
| Partially Received | Only some of the ordered quantity arrived. An additional input field appears — enter the actual quantity received. |
| Damaged | Goods arrived but are not sellable. These units will not be added to inventory. Document for your supplier claim records. |
| Not Received | This item was on the PO but did not arrive with this delivery. The PO will remain open for this line item. |
| Cancelled | You and the supplier agreed to remove this item from the order entirely. The line is closed with zero cost. |
Once all items are marked, click Next → to proceed.

Step 2 — Inventory Decision
For all items marked as Fully or Partially Received, decide whether and how to update your inventory:
- Matched Products (already exist in your inventory)
- The system finds the matching inventory item and shows a stock preview: "Current stock: 12 → New stock: 27". You can see exactly how your stock will change before confirming. Use the toggle checkbox to include or exclude any item from the update.
- Unmatched Products (new items not yet in inventory)
-
A compact inline registration form appears for each unmatched item. Fill in:
- Category — select from the 14 available categories
- Unit — e.g., Bag, Piece, Metre
- Reorder Level — the minimum safe stock quantity

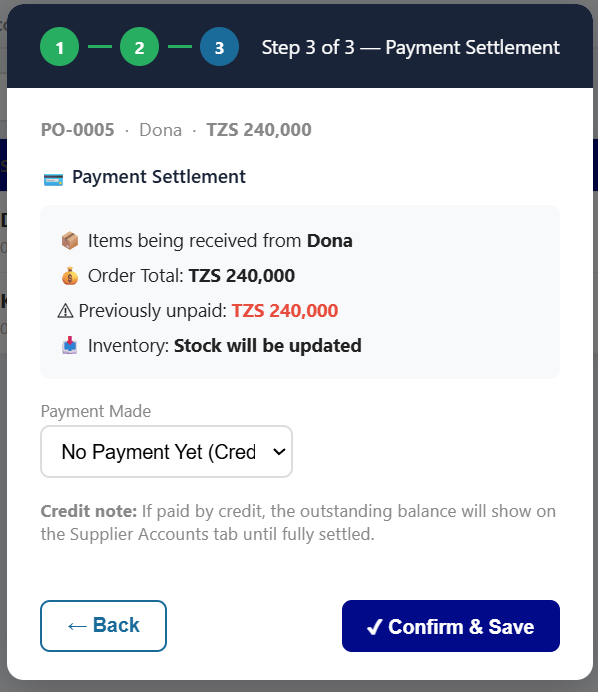
Step 3 — Payment Settlement
Record how you are paying the supplier for the goods received in this delivery:
| Option | What Happens |
|---|---|
| Cash (Fully Paid) | You are paying the full invoice amount now. The PO is marked as Settled. No outstanding supplier balance created. |
| Partial Payment | Enter the amount you are paying now. The remaining balance is recorded as an outstanding amount owed to this supplier in Supplier Accounts. |
| Credit (Pay Later) | No payment made at this time. The full invoice value is recorded as an outstanding supplier balance. You record payments later from the Supplier Accounts card. |
Click Complete Receiving to finish. Your inventory is updated, and the PO status changes to Received (or Partial if some items were not received).
Supplier Accounts
The Supplier Accounts card at the bottom of the Purchase Orders tab summarises your financial relationship with each supplier:
| Column | Description |
|---|---|
| Supplier | Name and contact phone number. |
| Total Ordered | Cumulative value of all POs ever raised with this supplier. |
| Total Paid | Sum of all payments recorded against this supplier across all POs. |
| Outstanding Balance | The amount you currently owe this supplier (Total Ordered − Total Paid). Displayed in red when the balance is overdue based on your payment term calendar entries. |
Click any supplier row to open a full transaction history showing individual POs, delivery records, and payment entries. Use the Record Payment button there to log a partial or full payment against the outstanding balance.
📈 Reports
The Reports tab gives you structured financial analysis of your business over any time period. Reports are generated instantly from your confirmed sales and received purchase order data.
Period Reports & KPI Cards
At the top of the Reports page, select your reporting period:
- Daily
- Data for a single date — use the date picker to select any day.
- Weekly
- The 7-day period ending on the selected date.
- Monthly
- A complete calendar month — select the month and year.
- Custom
- Define your own start and end dates for complete flexibility. Useful for quarterly reviews or financial year-end reporting.
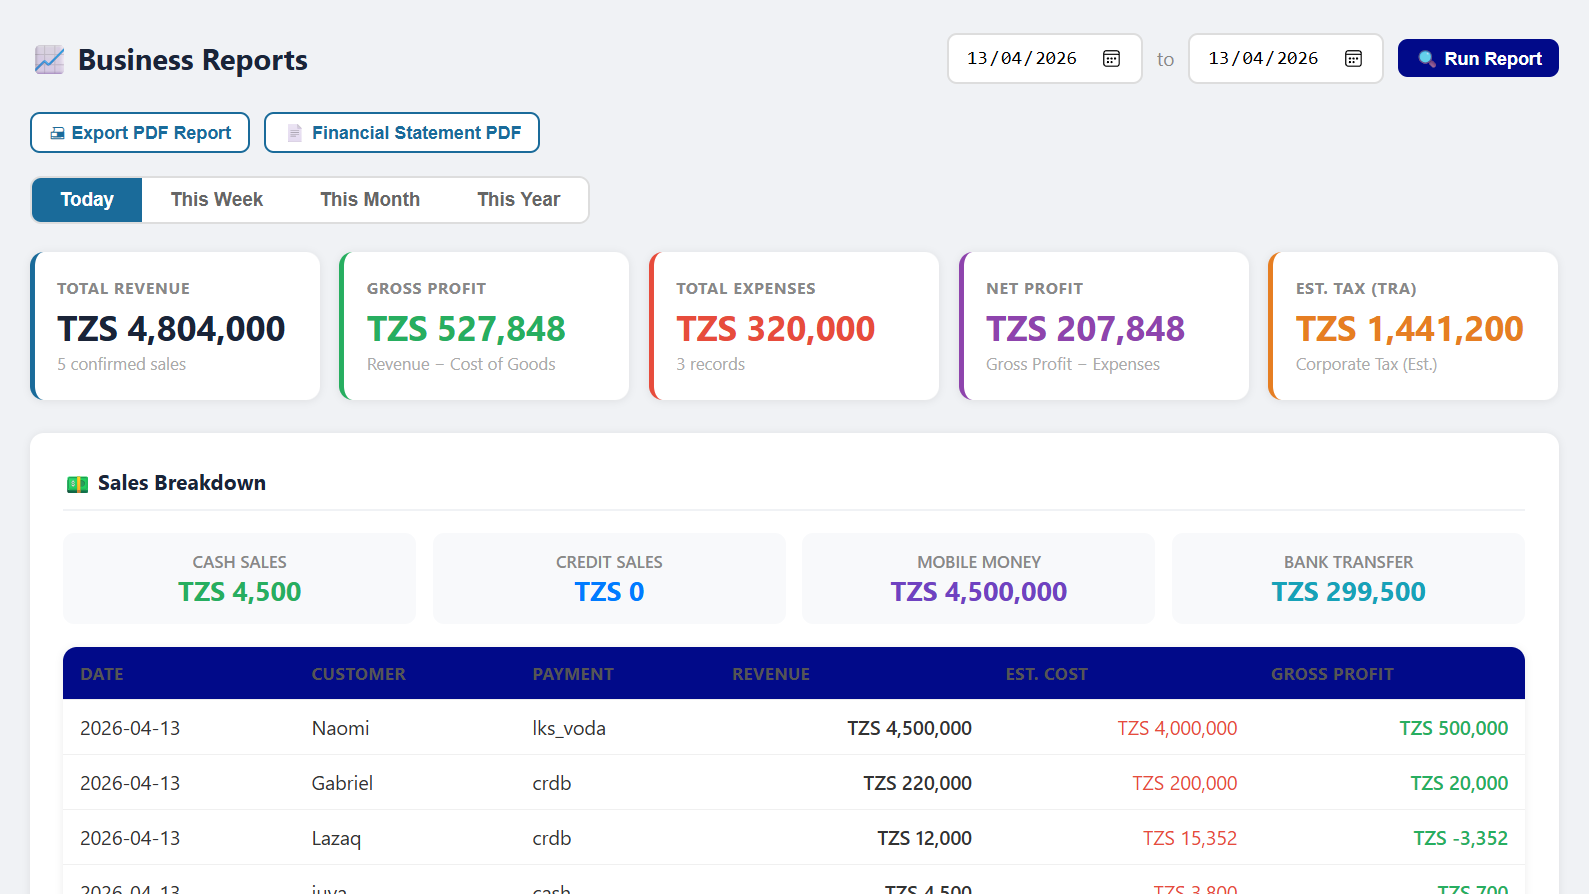
Four KPI cards update automatically for the selected period:
| KPI Card | Definition |
|---|---|
| Revenue | Total value of all confirmed sales in the period. Includes both paid and credit (unpaid) sales. |
| Gross Profit | Revenue minus the cost of goods sold. Calculated as (Selling Price − Cost Price) × Quantity for every item sold in the period. |
| Expenses | Total purchase cost of goods received via Purchase Orders during the period. |
| Net Profit | Gross Profit minus Expenses. The bottom-line profitability of the selected period. |
Profit & Loss Statement
Below the KPI cards, a full Profit & Loss statement is displayed in a structured, accountant-ready format. It breaks down revenue by product category and costs by expense type, giving a clear picture of which parts of your business are most and least profitable.
- Select your desired reporting period using the period selector at the top.
- Review the P&L statement displayed on screen — it updates immediately as you change the period.
- Click Export PDF to download a branded, print-ready P&L report. The PDF includes your company name, address, report period, and is formatted for sharing with your accountant or bank.
TRA Presumptive Tax Estimates
For businesses operating under Tanzania's presumptive tax regime, the Reports tab includes a TRA Tax Estimate section. Based on your total recorded annual revenue, the system automatically calculates your estimated tax liability using the official Tanzania Revenue Authority (TRA) presumptive tax brackets:
| Annual Turnover (TZS) | Applicable Tax |
|---|---|
| 0 – 4,000,000 | Exempt — No presumptive tax payable |
| 4,000,001 – 7,000,000 | 3% of total turnover |
| 7,000,001 – 11,700,000 | TZS 90,000 + 3.5% of the amount exceeding TZS 7,000,000 |
| 11,700,001 – 100,000,000 | TZS 254,500 + 3.8% of the amount exceeding TZS 11,700,000 |
| Above 100,000,000 | 30% Corporate Income Tax — standard corporate tax regime applies; consult a registered tax consultant |
⚙️ Settings
The Settings tab lets you personalise how your business is represented in the system and how all generated documents look. All changes take effect immediately across the entire application.
Company Information
Your company details appear on every PDF document the system generates — receipts, purchase order confirmations, and P&L exports. Keeping these accurate ensures your documents look professional and contain the correct contact information for your customers.
- Business Name
- Your shop's trading name. Displayed as the main heading on all PDF documents.
- Phone Number
- Your business contact number. Printed on receipts so customers can call or WhatsApp you easily.
- Address
- Physical location or postal address. Printed on documents below the business name.
- Website
- Optional. If provided, it is printed on receipts — useful if you run a social media page, online shop, or WhatsApp catalogue.
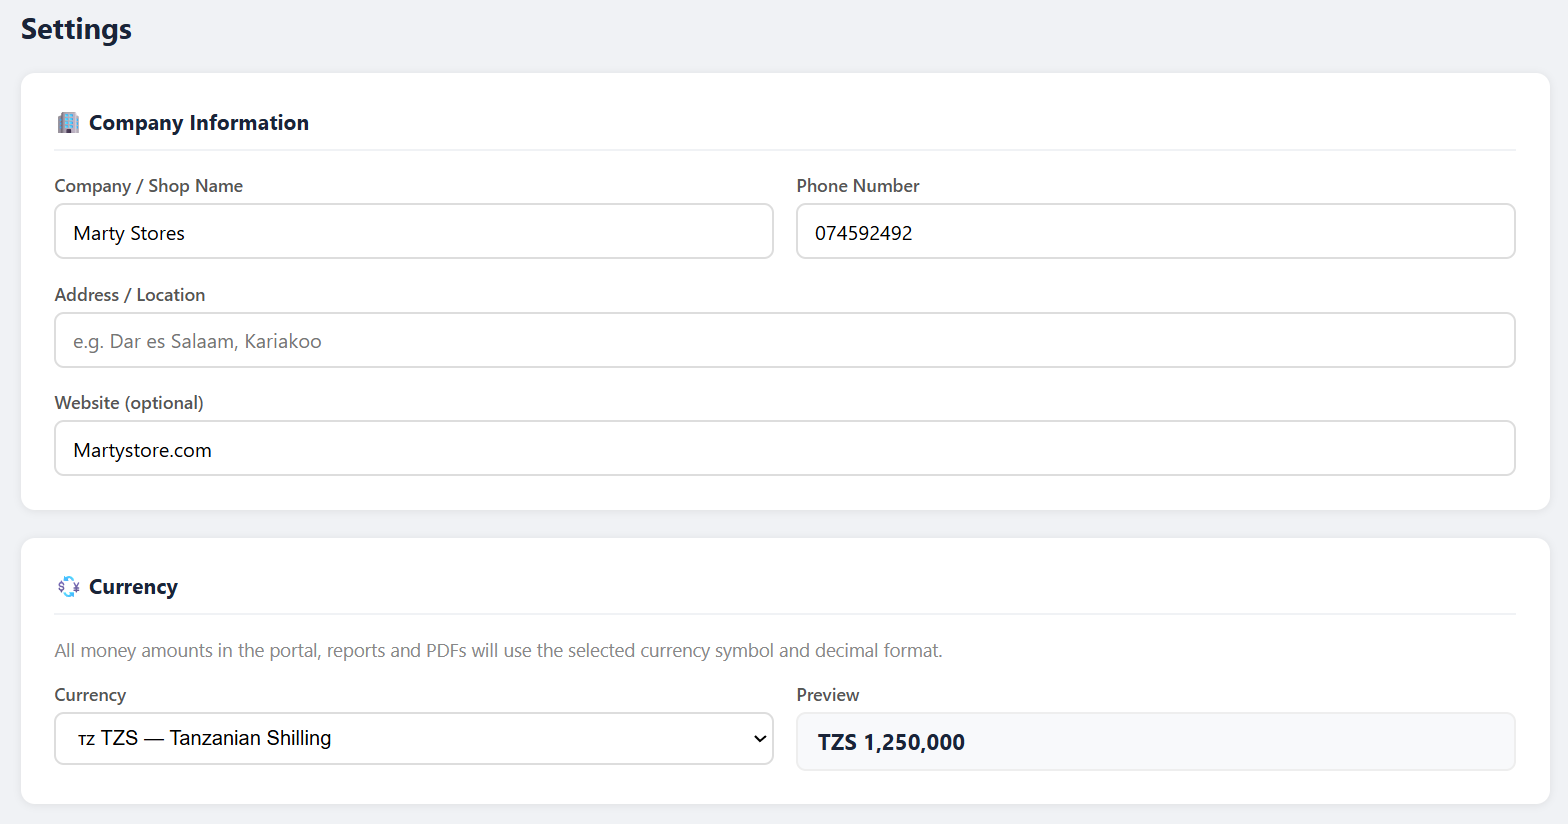
Currency Settings
The currency setting changes how all monetary values are displayed throughout the application — on the dashboard, in reports, on receipts, and in order forms. It applies globally as soon as you save the selection.
Available currencies include:
TZS — Tanzanian Shilling KES — Kenyan Shilling UGX — Ugandan Shilling USD — US Dollar EUR — Euro GBP — British Pound ZAR — South African Rand and additional currencies
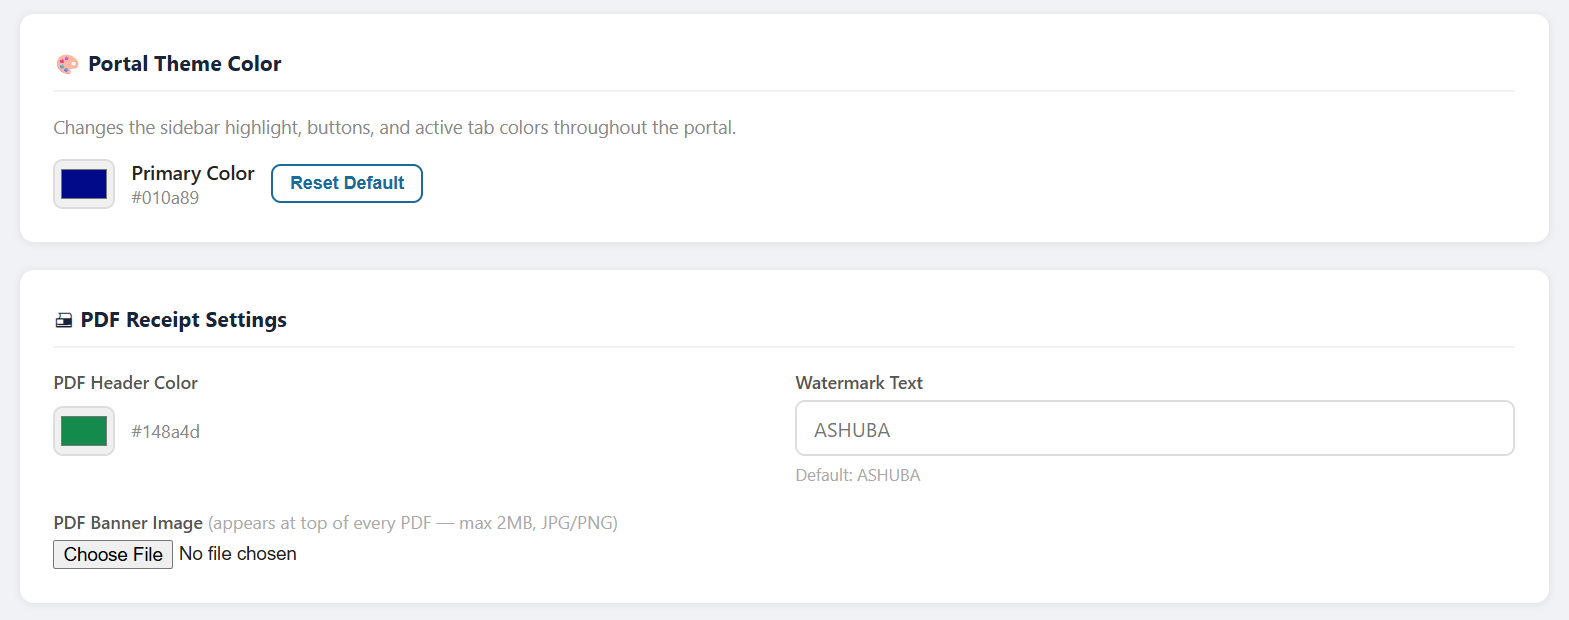
Theme & PDF Customisation
Personalise the look of the application interface and the appearance of all generated PDF documents:
- Theme Colour
- The primary accent colour used in the app interface — buttons, active states, and highlights. Select from presets or enter any custom hex code (e.g.,
#1A6B9A). - PDF Header Colour
- The background colour of the header bar printed at the top of all PDF documents. Defaults to the brand blue. Change it to match your own shop branding.
- Watermark Text
- Text printed diagonally across all PDF receipts and reports as a semi-transparent watermark. Common values:
ORIGINAL,COPY,CONFIDENTIAL. Leave this field empty for no watermark. - Banner / Logo Image
- Upload a JPG or PNG image to appear at the top of all PDF documents. Recommended size: 600 × 200 pixels, maximum file size 2 MB. Use your business logo or a branded banner image.
- Business Calendar Deadlines
- Add custom recurring or one-off events that appear in the Dashboard Business Calendar. See the Dashboard section for full details on how calendar events work.
📴 Offline Mode
AshubaSHOP IMS is built to keep working even when your internet connection drops or becomes unstable. This is essential for hardware stores in areas with intermittent mobile data coverage.
How Offline Mode Works
The application uses service worker caching — a browser technology that stores the app's code and interface locally after your first visit. On all subsequent visits, the app loads from this local cache, even with no internet connection at all.
When you are offline, the following applies:
- The full app interface opens and is usable as normal.
- Your last known data — products, orders, sales, and reports — is displayed from the locally stored snapshot.
- You can browse, search, and review all existing records.
- New entries and changes you make are saved to a local queue in your browser's storage.
- An orange banner appears at the top of the screen showing how many changes are waiting to be synced (e.g., "3 changes queued — reconnect to sync").
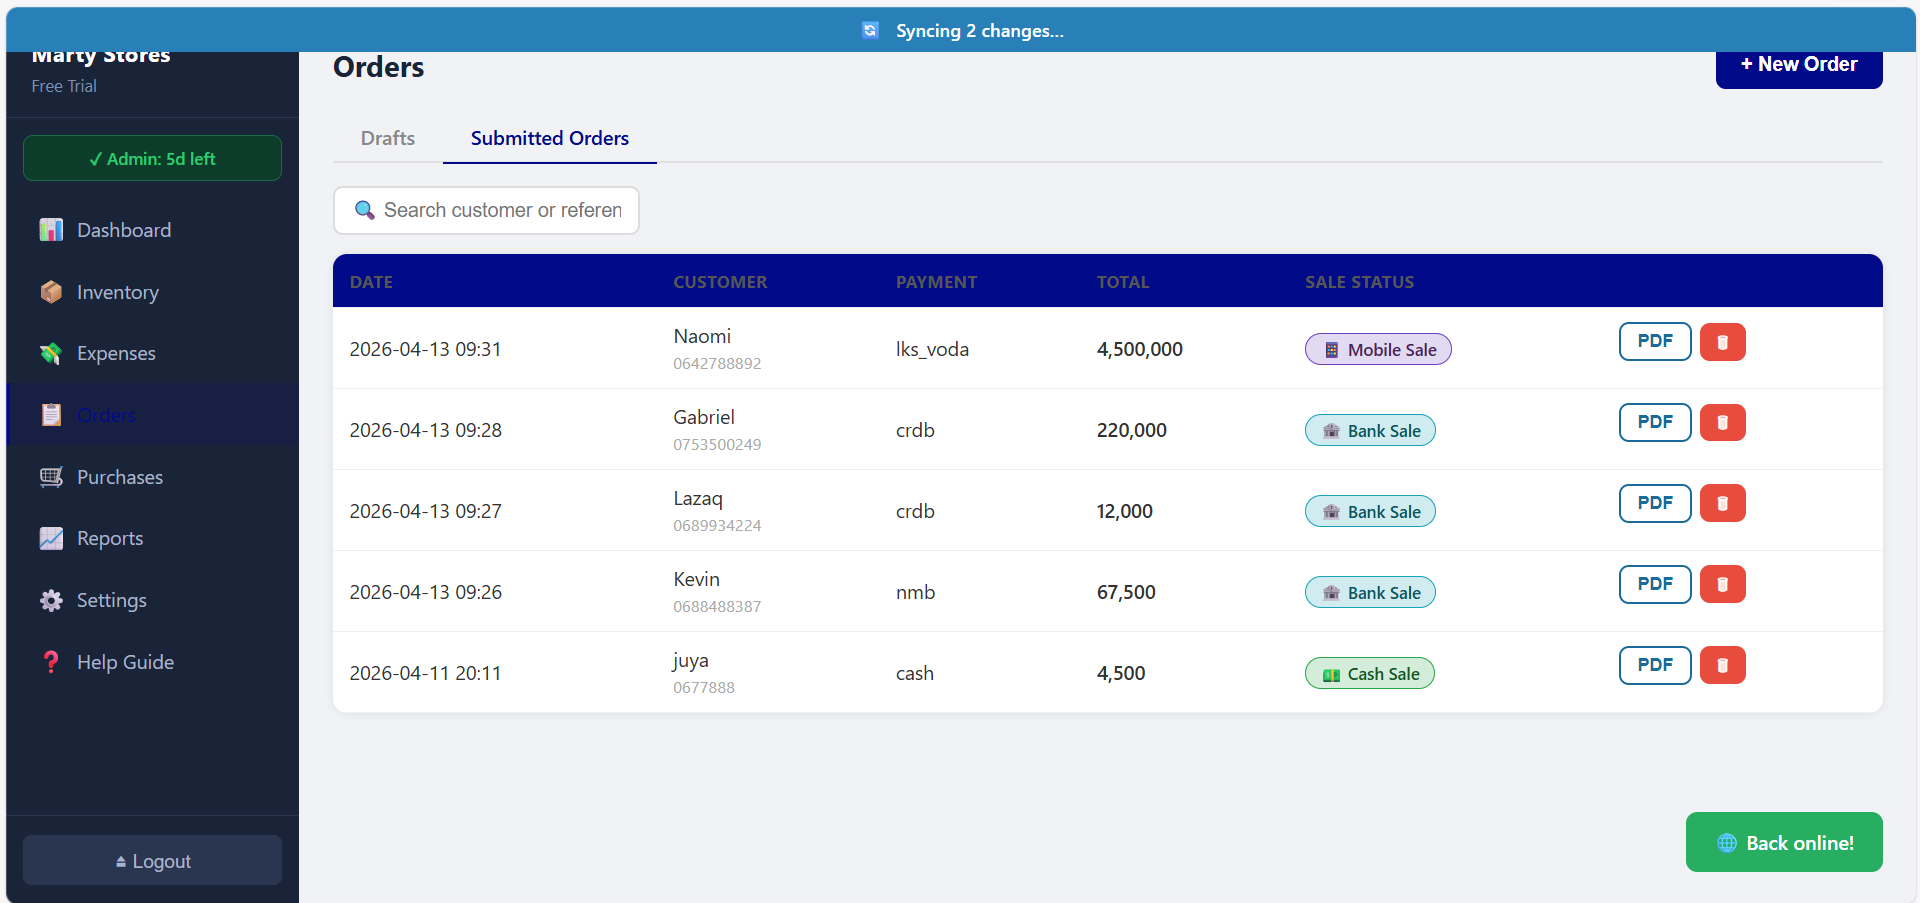
Syncing Changes When Back Online
As soon as your device reconnects to the internet, the app automatically detects the connection and begins uploading your queued changes to the server in the background.
- Automatic Sync: The app silently detects network reconnection and uploads all queued changes in the correct chronological order. The orange banner disappears when the sync is complete and your data is up to date.
- Manual Sync: If you want to trigger an upload immediately (for example, when you step outside briefly to get a signal), tap the ↑ Sync Now button that appears in the orange offline banner. The sync begins immediately.
- After sync completes, a brief confirmation message shows how many records were successfully uploaded. If any records failed due to a data conflict or server error, they are flagged individually so you can review and resolve them manually.
AshubaSHOP IMS Free Trial — User Guide — ashubashop.com/trial/